Tuesday, January 31, 2012

TODDLER TUESDAY- NAME BLOCKS


Hello! These name blocks were one of my very first attempts to be crafty, but they did turn out to be so cute!


I purchased the pre-cut, beveled edge blocks and the green with pink polka dot ribbon at Craft Warehouse.  Drilled two holes at the top of each block (to run the ribbon through later for hanging).  Then I double coated all the blocks with a pink Folk Art craft paint using a foam pad paint brush, both purchased from Walmart.  I stuck on vinyl lettering, a decorative flower and butterfly that I had cut with my Cricut machine (this part could easily be replaced by using a stencil with spray paint for those of you who don't own a Cricut). Lastly, I cut pieces of ribbon and laced through the holes, tying knots to make a loop, then hung them from a nail. Very simply done!

Heather

Monday, January 30, 2012

MAKEOVER MONDAY--MY OFFICE/CRAFT ROOM MAKE-OVER PART 1

Good morning! This is PART 1 of my office makeover- the organization of my desk area.  My office was horribly cluttered and unorganized, especially at my desk.  So my goal was to add some features for organization and to give it a cleaner look with a fresh color. Here is the BEFORE pictures of the desk wall/area.


The picture below was a really cute arrangement of my daughters pictures from birth to present.


However, my goal was to get some organization on my wall that would clear up the cluttered desk.


This is the AFTER.


These three blocks are cork board covered with cotton fabric, to be used for pinning up important notes, coupons, etc.


I got a pack of four 12" x 12" at walmart. Cut the fabric 1 inch larger than the perimeter. Folded over the edge and hot glued down to the board.


I made sure to tuck the corners, like you would on a present, to make the corners nice and sharp.  Then add whatever ribbon or embellishments you would like, attached with hot glue in the same manner.


The old shutters were something I had sitting around. I just added a fresh coat of paint and nailed to the wall to be used as a wall file. I would have to encourage spray paint on these, as the traditional paint was hard to get between the slates and to keep from dripping. 


This door was picked up at the Junk Barn Girls first showing this last summer. I picked it up unfinished for $20. Painted on the color I wanted, plus some chalk board paint from home depot. I planned to use it for my project list, but it is currently my daughters favorite thing to decorate with her colored chalks.


This frame I use with clothes pins to hang just about anything. I just love the chicken wire!


I got the frame on a black Friday special two years ago from walmart. I just simply painted it flat black and stapled on a piece of chicken wire. Then I painted clothes pins to use for hanging. Turned out super cute!


I used another of the same kind of frame to make a magnet board (not shown in the office yet). Again, just painted it flat black, cut a piece of roofing metal from home depot to size, and hung it on the wall. Quite possibly a DIY magnet tutorial in the near future!


That's all for now! Stay tuned for Part 2 of this makeover. I will post it in about a month, as there are a few things I have left to do that must wait until after I have this baby! It will definitely be the most exciting part of the makeover yet! I can't wait to share it!! :)


Heather


Saturday, January 28, 2012

MY TOP 5 CLEANING TIPS

Here are just a few cleaning tips that may save you money, time, and elbow grease!


1.  The Mr. Clean Magic Eraser is your friend. It will cut your cleaning time in half for bathtubs, sinks, counter tops, and dirty walls. MONEY SAVING TIP--BUY MELAMINE FOAM SHEETS IN THE INSULATION SECTION OF YOUR NEAREST HOME IMPROVEMENT STORE--ITS THE SAME THING AT A FRACTION OF THE PRICE!!


2.  Vinegar and water is a great deodorizer for a musty bathroom. Spray your shower down as you're getting out. It really absorbs the odors, and the smell of vinegar goes away in an hour.


3.  Clean your microwave oven by microwaving a cup of water with some baking soda in it until it's boiling. That eliminates odors and makes it super easy to wipe away all that stuck-on stuff.


4.  To eliminate that ring in your toilet, drop in a bubbling denture tablet, and leave it for at least 30 minutes or overnight. The stain will come off with just a few swishes of the brush. BIG ELBOW GREASE TIP- USE SHEET ROCK SAND PAPER THAT LOOKS LIKE A BLACK MESH FROM HOME DEPOT TO GET THE RINGS AND HARD WATER OFF YOUR TOILET.


5.  BIGGEST MONEY SAVING TIP-- Use a 50/50 mix of peroxide and white vinegar in your carpet shampooer instead of the expensive carpet cleaning detergents. Your carpets will come cleaner and smell fresher just like a professional did them!


Heather

Friday, January 27, 2012

DIY BROWN SUGAR AND VANILLA BODY SCRUB

For those of you that get the horrible winter skin, eczema, or just like to pamper yourself, this is a fantastic and easy recipe for your own body scrub! I use this scrub at least every other day, if not EVERY day. My skin is so soft and the best part is that it keeps the eczema and winter dry, itchy skin away!


What you need:

INGREDIENTS-

2 cups brown sugar
1 cup white sugar
1 cup vegetable oil
4 tsp vanilla extract (can substitute with essential oils for a different fragrance)


SUPPLIES-

Mixing Bowl
Mixing Utensil
Containers store the scrub (I used 2 pint jars)


INSTRUCTIONS-

Combine both sugars together until evenly blended. Add oil and vanilla, mix until evenly distributed. Pour contents into a sealable container.


USE-

Scoop product and scrub onto skin. Can be used daily in your shower or when u wash your hands. I use on my whole body in the shower and each container lasts me about 1-2wks.

ENJOY!!

Heather

Thursday, January 26, 2012

THOUGHTS ON THURSDAY- MY REVIEW OF I-ROBOT ROOMBA

When I first heard of the little robot that cruises around your house vacuuming and sweeping all the floors, I immediately thought how nice that would be, but that it was not practical. Well, with the new baby coming and a little anxiety about how I am going to keep my OCD cleanliness standards met with double mommy duty, I broke down and bought one at Costco on Monday. I can tell you that I did choke a little about how much I paid, even though it was the cheapest of all the models, but I am not sorry that I bought one after only 3 days!


I purchased the I-Robot Roomba Pet Series 550. This little robot can be scheduled and programmed to clean up to 4 rooms at any time of day, which generally covers your high traffic areas. Additional rooms require you to set the robot in the room, push the "clean" button, and then walk away. The machine will turn itself off when the room has been completed. The machine also comes with a docking station, so that it may dock and recharge itself when the batteries are low, then return to cleaning or remain docked until you want to use it again. My husband and I were both a bit skeptical about the power of the suction on the vacuum, but after the machine cleaned a room that had just been vacuumed with our central vac, we were convinced that it really does a good job. The filter and dust pan were filled with a lot of very small dust particles, pet hair that was not visible to my eyes, and heavier metal objects like coins and screws that may have been under edges that a normal vacuum cannot reach.  The robot is very "smart". It slows down before  bumping into perimeter surfaces or furniture, it can sense stair ledges, changes from vacuum to sweep mode on its own, spends more time where it detects higher concentrations of dirt, and is equipped with several features that allow it to escape or avoid getting stuck on rugs, cords, etc.


After testing this product the last few days, I am convinced that it was well worth the money ($280). I pay a housekeeper to come into my home every two weeks to do a few hours of deep cleaning. The housekeeper spends at least two hours a month on my floors, costing $30 per month. At that rate, the robot is still $80 cheaper per year and I can have the clean floors every few days verses every two weeks at the most. The robot also comes with a one year warranty.


I would recommend this to most households, especially those with pets and children. Even though I am a stay-at-home mommy, my days are busy and filled with chores. This handy robot has taken an estimated 4-6 hours per week of cleaning time off my plate. I now have extra time to tackle a hobby project or to play with my little one. If I continue to enjoy this product over the next few months, I will definitely consider spending the money for an I-Robot Scooba, which is the equivalent robot that mops.

I hope this review spiked your interest and that you check it out! Have a great day!

Heather

Tuesday, January 24, 2012

CONVERTIBLE CRIB/TODDLER BED NURSERY SET
 I am just totally excited to post a project that has been in the works for the last six months. Let me clarify, it doesn't take that long to finish, but I literally bought the fabric for this project six months ago. My January resolution is to finish projects that I have already purchased materials for, especially ones for my 2yr old daughter and my new baby boy who is about to arrive any day now! Might I add, what a great way to curb this nesting appetite of mine!
This is a fabulous tutorial for a fun fresh look for a crib or, as I found, for a toddler bed as well. We moved my daughter into a toddler bed around Christmas time because she started crawling out, and not too gracefully either! After a few weeks of hearing her bonk her head on the frame as she slept, with a few bruises and even a bloody nose to show for it, we started wrapping that caterpillar creature you can see in the corner and a few blankets around her to pad the frame. Of course, this just didn't satisfy me, so first thing on my agenda was to finish her bedding and to use the crib bumper in this fashion.


You can see in this picture how I took the additional bumper segment and used it on the headboard to give added protection above her pillow as well. This also gave a space for crawling in and out of the bed without tromping down one of the pads.


I don't know if its just the fabric or the beautiful bright colors that I love, but isn't this just the cutest way to add some safety and comfort to your toddler's room! My little one just loves her "big girl" bed and has to show it to everyone! 


The best part about this set, is that it can be used in a crib and then converted over to a toddler bed, giving more years of use to spread out the cost of the project! Below is a picture of the same patterns shown in a crib. The pleated bed skirt is the only exception, which I thought gave a more masculine look for a boy's room. My little boy should be here anytime, so I figured now is the time to get this project done before my mommy workload doubles!


Here are the tutorials for the crib sheet, ruffled bed skirt, bumper pad, and the pleated bed skirt. Stay tuned for some fun coordinating accessories that I plan to make for my toddler's room and for the new nursery. Happy sewing! I would love to see what fabrics you choose to create your own nursery bedding!

Heather

Saturday, January 21, 2012

SATURDAY---PENDLETON WHISKEY UPGRADE

Good afternoon everyone! I hope you are having a fantastic Saturday! For those of you in the Hermiston/Pendleton area, be very careful on the roads today. I have always been told that ice is the most dangerous when it starts to melt and today looks like a lot of melting is going to happen!


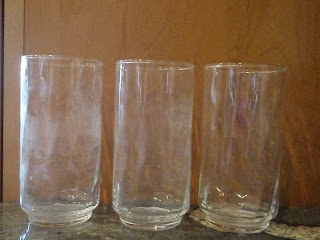
My husband and I got the big idea to have Pendleton whiskey bottles cut down to glasses. We originally thought they would be perfect as whiskey glasses to be given with a fifth of whiskey to some friends for Christmas. After we had them cut down, my husband said the glasses were way to big and it would be like drinking a double!  He also said that by the time you got to the bottom of your glass that the ice would have melted and made your whiskey watered down. Who knew? I am not a whiskey drinker, I just saw possibilities with the bottles!  So, I immediately got excited about replacing our water glasses from college days. Remember these (below)? I am pretty sure they were a cheap buy about ten years OR MORE ago. Believe it or not, those glasses are also clean, as clean as I can get them here on the farm with hard, hard water! Needless to say, it was nothing to box these babies up and send them to the Agape house!


This is how the pendleton whiskey bottles turned out. It took about 3 years and a couple households to provide all the fifths of Pendleton bottles.  They clean up very well in our dishwasher and don't show the hard water deposits at all.  They are a very heavy, chunky glass, but everyone seems to compliment them!


 You can have this done at your local glass shop in town. We had ours done at Hermiston glass for $10 per bottle. I recommend paying to have it done by a glass shop if you are going to use these for drinking. The glass place does an excellent job of leveling the cuts and sanding down the edges to a smooth, safe surface.


Sometime in December my husband found the Pendleton 1910 bottle that has a neat western scroll design with a pendleton bucking horse, so we had that bottle made into a whiskey glass. It turned out to be the right size, so we got another bottle to have a matching set made. These would be really great as a gift.


I tried to get a little closer in a different light to show the bucking horse.


Here is another creative idea with bottles that I found on pinterest. I took half gallon Pendleton whiskey bottles and had the same local glass place cut the bottoms off.  Since these won't be used for drinking, you could easily cut your own glass and save yourself a dime ( I found a bunch of different tutorials and methods when I searched through pinterest and google).  I plan to find candles to put under them to add a little ambiance next to my jacuzzi tub.  I haven't found the right color and size of candle yet, but here is another candle I had just to give you the main idea. If you did cut the bottle yourself, you would have to remember to cut the bottom in a fashion that would allow air flow to suck in the bottom and out the top if you plan to use real candles. I don't particularly like the smell of smoke when you put a candle out, so I plan to use the battery operated ones.


Below is a bell made from a pendleton whiskey bottle that my grandpa made. He cut his own glass and secured the bell to the cork .  Its a cute little decoration on my mantle.


There are obviously a lot of different things that you can do with recycled bottles. My husband also made a half gallon bottle into a lamp for my folks. He plans to make another one, so I will post a full tutorial when he does. Its a really neat western look.

I hope you enjoyed these ideas! This next week will be filled with more DOING and less TALKING now that I have some the blog bugs worked out!

Have a great weekend!

Heather

Friday, January 20, 2012

FEATURE FRIDAY : VALENTINE'S SPECIAL ON MASSAGE


Hello Everyone! Feature Friday is meant to show some local support to vendors and people I love!

Britney Wood
Licensed Massage Therapist

Meringue Salon
1565 N 1st St Ste 400
Hermiston, OR 97838
(541) 571-2727

Britney Wood is a licensed massage therapist located in Hermiston, Oregon. Her techniques range from Swedish, deep tissue, and pregnancy massage.  She is very professional and knowledgeable. I have personally experienced a variety of her different techniques and can easily say that you will not be disappointed with your results! She is so good that I have recommended her to my own family.

Britney is running a current Valentines promotion of $5 off any massage. Give her a call today and treat yourself or somebody you love with a fabulous way to relax and be sure to mention that you saw this on SewMadCrafty!


Heather


Thursday, January 19, 2012

THOUGHTFUL THURSDAY- TURNING "NO" INTO A "YES"

Hello Everyone! Thoughtful Thursdays are really just meant for a little reflection, maybe a quote of the day, or just a simple discussion of the little things in life that amuse me!


As my toddler has gotten a lot more independent and adventurous, I have found myself telling her "NO" quite a bit. I just hate telling anyone "NO" because I don't like to hear it myself. In fact, the more somebody tells me "NO", or tells me that I can't do something, the more I want to do it anyway!! I can just see my father and mother, even my husband, rolling their eyes and shaking their heads with a smirk. I have always been pretty independent and, well, some may call it down right STUBBORN! Needless to say, this is how I have been turning a "No" into a "Yes".

After all the Christmas baking, my daughter quickly became aware of where I keep our sweets. So every morning like clockwork, she went right to that cupboard and asked for candy. In fact, she asked for it several times a day. My daughter doesn't do particular well with a lot of sugar, so instead of just telling her "No" all day, I began by telling her "Yes, you can have some, but after your nap". At first, she was pretty upset, but I continued to remind her that she could have some after her nap. I even reminded her when it was time to have some candy. If she asked for it again after already having some that day, I would simply say "yes, you can have some tomorrow after your nap".  After a week of conditioning to this, she stopped asking for it all the time. Now when she asks for it, I tell her "Yes, as long as you eat 4 more bites of your dinner". So now it has become an agreement. She can have some candy as long as she follows through with the agreement. 

This method has really changed  how my daughter and I interact throughout the day. I think that it establishes some patience, an understanding that she is going to have to DO something in order to GET something, and a trust that I am going to follow through with my end of the agreement as well. This is a method that I think can be used in any relationship to get positive results.


Would love to hear what you think! Have another great day, its almost Friday!!

Heather

Wednesday, January 18, 2012

WHATEVER WEDNESDAY- PHOTOGRAPHY OF FOG AND FROST

Hello! A few weeks ago we woke to some serious fog and amazing frost that lasted for days. I just LOVE capturing these kinds of natural phenomenons with a camera. I admit though, that I am a total novice when it comes to photography.


These pictures where taken with my Olympus Stylus 850 SW 8.0 megapixel camera, which generally does the job for most casual photographing. However, even though some of these pictures turned out beautifully, they did not actually capture the true vision that I was looking at with my own eyes.


Above and below are close up pictures of an autumn maple tree I planted last summer. It was amazing to me that each one of those spikes were about an inch or more in length! Had I been able to zoom out more, you would definitely get a clearer picture of the size.


Below is a close up of our sycamore tree. The frost was just amazing to see here too, but this was all the further I could zoom in. This sycamore tree is the same tree in the barn picture above.


These pictures prompted me to finally make the jump to a more professional digital SLR camera. I purchased a Canon EOS Rebel T2i 18. I am hoping to be able to capture the detail that you can see in the second set of pictures of the autumn maple without having to zoom in and miss out on the rest of the picture. The photographer that does my family portraits helped me pick out a camera that would suit my needs, but not something that was not so impractically out of my league and purpose. So over the course of the next year or more I plan to post more pictures and photography tutorials as I get acquainted with my new camera!

Have a great day!

Heather